Page |
 |
What You Need to Know:
|
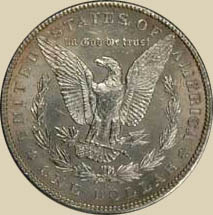 |
![[Click for larger version]](matting/ScreenCap20.jpg)
Summary:
I describe and illustrate a basic procedure for using Photoshop to create an eye-pleasing composite image of a coin's obverse and reverse from images captured by a digital camera. The techniques described in this article can be adapted to most standard image editors by users with a minimal level of experience.
Introduction:
Many beginning coin photographers struggle for many hours, days, or weeks before they are able to capture a coin photo they're satisfied with. Once that photo has been captured, they soon realize that they face a new problem: how to share it with their friends. A common way to display images today is by posting them on a coin message board. But how to format the photo so that it's easy on the eyes?
Simply cropping the image will yield quick-and-dirty results. Images like that show up regularly, but they're not going to impress anyone with their beauty. By simply mastering a few quick and easy image editing techniques, the coin photographer can present their new images in an attractive manner to anyone online.
The myriad of image editing tools in a popular editor such as Photoshop can be confusing to the novice, but for the purposes outlined above, a few simple tricks and methods can be easily learned and will yield great results. Below, I demonstrate a common task for the coin photographer: take two raw images (obverse and reverse) of a coin and place them side-by-side on a black background for posting on a website.
I have included sample screen captures along side my instructions as another aid to the reader. To view them, simply click on the image, then click your browser's "back" button to return to the commentary.
Notes:
Before I begin, I'd like to familiarize readers with a few basics that will make navigating through the image editor a little more understandable.
I sometimes refer to key combinations such as CTRL+A. This simply means "hold down 'CTRL' (control) and press the 'A' key."
I will regularly refer to menus (e.g. FILE or EDIT) and submenus (e.g. FILE >> NEW or IMAGE >> CROP).
I am assuming a basic understanding on the part of the reader of how to navigate through folders on the hard drive.
Procedure:
![[Click for larger version]](matting/ScreenCap01.jpg) |
We will start by opening the newly captured image (straight out of the camera) of the coin's obverse into Photoshop. The photo contains a lot of extraneous junk that we don't need, such as the surrounding surface the coin was photographed on and the lamp reflector. |
![[Click for larger version]](matting/ScreenCap02.jpg) |
First, we will roughly crop the image down to a more manageable size. Begin by using the rectangular marquee tool to select an area a little larger than the coin. Then select IMAGE >> CROP to crop the image down to the selected size. |
![[Click for larger version]](matting/ScreenCap03.jpg) |
Now that you have a smaller area to work with, select the entire area with the rectangular marquee tool (CTRL+A is a quick way to select everything). Using the arrow keys on your keyboard, move the selection marquee down and right until it exactly contacts the top and left edge of the coin. Then select IMAGE >> CROP to crop the image again. |
![[Click for larger version]](matting/ScreenCap04.jpg) |
Repeat the previous step, this time moving the selected area up and left so that you contact the bottom and right edge of the coin. Crop it again. |
![[Click for larger version]](matting/ScreenCap05.jpg) |
Now you have an image the exact height and width of your coin. There's still a lot of extra background to be removed though. At this point, you may need to rotate your coin image if the design was turned around when you photographed it (mine was correctly rotated to begin with). Select IMAGE >> ROTATE CANVAS >> Arbitrary and then play around with rotating the coin clockwise or counter clockwise by different degrees of rotation until you are satisfied. You may need to crop the rotated image back down to the coin's height and width after you are through. |
![[Click for larger version]](matting/ScreenCap06.jpg) |
Now that your coin is correctly aligned and the image is the same height and width as your coin, determine the size of your image in pixels by going to IMAGE >> IMAGE SIZE and taking note of the Width and Height. Don't change anything here. Just remember the numbers and click CANCEL to return to your image. |
![[Click for larger version]](matting/ScreenCap07.jpg) |
Click and hold on the rectangular marquee tool to make the additional marquee tools pop up from under it. Select the eliptical marquee tool. At the top of the screen, select "fixed size" and enter the height and width you obtained in the previous step |
![[Click for larger version]](matting/ScreenCap08.jpg) |
Click somewhere in the image to place your selection marquee. Use the arrow keys to move it around until it fits exactly inside the image area. It should now be precisely surrounding the coin. |
![[Click for larger version]](matting/ScreenCap09.jpg) |
Go to EDIT >> COPY to create a copy of the image of the coin. |
![[Click for larger version]](matting/ScreenCap10.jpg) |
Go to FILE >> NEW to create a new image file. Input the same width and height if they're not already selected. Also select 'transparent' which will create a new image file with a transparent background color. Click OK. |
![[Click for larger version]](matting/ScreenCap11.jpg) |
When the new image file opens up, click EDIT >> Paste to paste the obverse image into the file. You now have a file containing the image of your coin on a transparent background. Go ahead and save this file for future use. I suggest saving it in a lossless format such as PhotoShop's proprietary format of .PSD* If you decide to save it as a .JPG at this point, save it at the maximum quality you can choose. |
![[Click for larger version]](matting/ScreenCap12.jpg) |
Next, repeat all of the previous steps with the raw image of your coin's reverse. Remember that your width and height may not be exactly the same as it was for the previous image; as long as they're close (within 10-12 pixels) everything should be fine. You're almost there!! |
![[Click for larger version]](matting/ScreenCap13.jpg) |
Once you have finished isolating your coin's reverse, click FILE >> NEW to create a new image file for what will become your composite image. Choose a width a little more than twice as wide as your image and a height a little larger as well. This will give you a little room to wiggle. |
![[Click for larger version]](matting/ScreenCap14.jpg) |
First, select the entire image of your obverse (SELECT >> ALL), then copy (EDIT >> COPY) and paste it into the new image file (EdIT >> PASTE). Using the rectangular marquee in normal mode (you may need to switch back to it from the Elliptical marquee and from "fixed size" mode), select an area enclosing the image. Hold down CTRL and drag the image where you want and release it. Repeat with the coin's reverse image. When you paste it, the image will be within a different layer in the composite image, so just drag and drop it like the obverse isn't there. When the two images are where you want them, select LAYER >> MERGE VISIBLE. If you save the new composite image in .PSD format*, you can use it at a later time to create images with different background colors if you want. |
![[Click for larger version]](matting/ScreenCap15.jpg) |
Now, set your background color to the color you want to be behind your final image. Next, select FILE >> NEW and specify the same width and length as your composite image. Be sure to select 'background color' on the menu. Click OK. |
![[Click for larger version]](matting/ScreenCap16.jpg) |
Go back to the composite image on a transparent background and click on SELECT >> ALL and then copy the selection. |
![[Click for larger version]](matting/ScreenCap17.jpg) |
Go to the new image with the colored background and click EDIT >> PASTE. Save this file in PSD format for future use. You may now modify the size (IMAGE >> IMAGE SIZE) to create a smaller-sized version of this image for display on the internet. I like to make my images for message boards no wider than 850 pixels. When you have altered the size of your image to your satisfaction, click FILE >> SAVE FOR WEB |
![[Click for larger version]](matting/ScreenCap18.jpg) |
In the SAVE FOR WEB dialogue, choose a quality level. I suggest JPEG High or JPEG Medium. When you've selected your quality, click SAVE. |
![[Click for larger version]](matting/ScreenCap19.jpg) |
Choose a file name and make sure you've selected "Images only" under "Save as Type". Click SAVE. |
|
|
The final result! |
Footnotes:
* At several points in the instructions, I suggest saving your file in Photoshop's proprietary format: ( filename.PSD ). Saving your file as a jpeg (filename.JPG) image can result in a loss of resolution, because JPG format compresses your image to conserve hard drive space. Saving in PSD format until you're ready to 'publish' your photo online enables you to preserve the most image quality prior to putting your image up online.
** Don't like your coin against a black background? Experiment with different colors once you've learned the techniques I discuss! Advanced users can also include a copy of a coin's slab certificate or insert their name or notes in the coin image. Once you've learned the basics, play with the software a little and see what you can do with it.
Copyright Notice:
This article is copyright (c) 2006 by Michael C. Parrish. All rights reserved.
If you wish to duplicate this article, please contact Michael via email at: pendragon1998@yahoo.com.